Tuesday, November 20, 2012

BYU's Mint Brownies

While I was going to school at Brigham Young University (BYU), it was always a challenge to stay away from their made-from-scratch orange rolls, chocolate covered cinnamon bears, cinnamon rolls and especially their mint brownies. Soft, chewy and fudgy with a thin layer of mint frosting topped with a creamy, melt-in-your-mouth layer of chocolate frosting. Sinful and decadent.

Now that I live across the country in Tennessee, these brownies are kind of out of my reach, which is why I was so excited when I stumbled across the recipe that was posted in the BYU magazine back in 2003.

Let's start with the brownie part first. This was a super easy brownie recipe since it just calls for cocoa powder instead of melted and cooled chocolate. The resulting brownie was so soft, chewy and fudgy - just like the ones I remember! That's a big plus for homemade brownies since half of the time mine turn into hard bricks. :)

The frosting was also really simple and had a fantastic flavor. I love the light mint flavor combined with the chocolate frosting. And since the mint layer is tinted a light green, it makes me feel all fancy and professional, even though I'm FAR from that... Serve these with a scoop of vanilla bean ice cream to take them over the edge. Oh, and if you make this large 9x13 size, make sure you take it to a party where there are a LOT of people to eat them. Otherwise you'll end up with a half of a pan full of these bad boys sitting at home. Not a good start to the Holiday season..

Ingredients:

Brownies:

  • 1 cup (2 sticks)  margarine
  • 1/2 cup cocoa
  • 2 Tbsp. honey
  • 4 eggs
  • 2 cups sugar
  • 1 3/4 cups flour
  • 1/2 Tbsp. baking powder
  • 1/2 tsp. salt
  • 1 cup chopped walnuts (optional - I leave these out)
Mint Icing:

  • 5 Tbsp. margarine, softened
  • dash of salt
  • 1 Tbsp. light corn syrup
  • 2 1/3 cup powdered sugar
  • 1/2 tsp. mint extract
  • 1 - 2 drops green food coloring
  • 3 Tbsp. milk
Chocolate Icing:

  • 5 Tbsp. margarine, softened
  • dash of salt
  • 1 Tbsp. light corn syrup
  • 2 cups powdered sugar
  • 1/3 cup cocoa powder
  • 3 Tbsp. milk
Melt margarine and mix in cocoa. Allow to cool. Add honey, eggs, sugar, flour, baking powder, and salt. Mix well. Add nuts if desired. Pour batter into a greased 9-by-13 baking pan. Bake at 350 degrees for 25-30 minutes, or until a toothpick inserted in the center comes out clean. Cool.

Prepare mint icing: Soften margarine. Add salt, corn syrup, and powdered sugar. Beat until smooth and fluffy. Add mint extract and food coloring. Mix. Add milk gradually until the consistency is a little thinner than cake frosting. Note: You still want the mint frosting to be thick enough to spread and have it stay in place. Don't add more than 3 Tbsp. of milk or the consistency will be too thin.

Spread mint icing over brownies. Place brownies in the freezer for a short time (15-20 minutes) to stiffen the icing. Mix up the chocolate icing the same way as the mint. Remove the brownies from the freezer and carefully add a layer of chocolate icing. Keep brownies stored in fridge until ready to serve.

Monday, November 19, 2012

Cranberry-Orange Sauce

There's nothing quite like leftover turkey on a homemade dinner roll slathered with cranberry sauce. Especially this amazing, homemade cranberry-orange sauce with a hint of cinnamon. Mm.. My mouth is watering just thinking about it. This sauce is really easy to make and tastes ten times better than the canned Oceanspray cranberry sauce you can buy year-round. Thanksgiving only comes once a year, so why not take the extra ten minutes to make your own instead of using that awful looking canned sauce that has jellied ridges from the aluminum? 

Honestly though, this sauce really only takes about 10 minutes to throw together! Put in a fancy silver dish on the table and you'll take your turkey to whole new level! (Picture courtesy of This Week for Dinner)

Ingredients:
  • 1 12-oz. bag of fresh cranberries
  • 1 cup brown sugar
  • 1 tsp. cinnamon
  • 1 cup chicken broth
  • 1 orange, roughly chopped
Put all ingredients into a medium saucepan. Bring to a boil, then reduce heat to medium-low and let it softly simmer for about 10 minutes or until the cranberries begin to burst and release their juices. Sauce will thicken slightly and all of the flavors will meld together to create an amazing tart-sweet flavor! Let cool and serve cold.

Tuesday, November 13, 2012

Thai Chicken Peanut Noodles

Recently Neal and I have really enjoyed Thai-style dishes, especially this CPK's Thai Chicken Salad. I recently I ran across this recipe that is pretty similar, except it's made with noodles instead of lettuce! The sauce definitely makes this dish with the fresh ginger, sesame oil, cilantro and peanut butter. Seriously, wait until you have all of the ingredients before you make this. It makes a big difference to have those fresh, flavorful ingredients on-hand. This can definitely be added to one of those quick "weeknight" meals that we all desperately need from time to time (or at least I do...). This could also be made into a great side dish instead of your usual rice or potatoes. This recipe serves 6 people easily so cut it in half if you only need to feed 2 or 3 like I usually do. (Recipe courtesy of The Sisters Cafe)

Ingredients:

  • 1 lb. whole wheat spaghetti noodles
  • 1/2 cup onion, chopped finely
  • 1 large red or orange bell pepper, sliced thinly
  • 2 1/2 - 3 cups cooked chicken breast, diced
  • 1/4 cup dry roasted peanuts
  • 2 Tbsp. sesame seeds
  • handful of cilantro
Sauce:
  • 1 garlic clove, peeled
  • 1 (1-inch) piece of fresh ginger, peeled
  • 1/2 cup smooth peanut butter
  • 2 Tbsp. sesame oil
  • 1/4 cup soy sauce
  • 2 Tbsp. brown sugar
  • 1 Tbsp. rice vinegar
  • 1 cup hot water
Cook noodles according to package directions, drain and set aside. While they are cooking, place garlic and ginger in a food processor until well chopped. Add peanut butter, sesame oil, soy sauce, brown sugar and rice vinegar. Pulse until well combined. Slowly add hot water and pulse a few more times. Set aside. 

Saute onion and bell pepper in some olive oil for 2-3 minutes or until soft-crisp. Add onion, peppers and chicken to the cooked noodles. Add sauce and stir to coat. Top with peanuts, sesame seeds and cilantro, if desired. Serve warm.

Note: Sauce tends to pool at the bottom of the warm dish of noodles so make sure to give it a good stir before serving. 

Monday, November 5, 2012

Brown Sugar Cranberry Oat Muffins

Sometimes I get really tired of cereal and oatmeal for breakfast in the mornings. Every now and then I'll get up early enough to make myself something different like scrambled eggs and toast or a fruit smoothie, but most of the time sleep wins over breakfast and I end up grabbing a packet of oatmeal as I run out the door. Why didn't I think of making muffins more often for my grab-and-go breakfast? No idea. But now that the idea finally came to me I'll definitely be making some more often!

I start my work day early and usually leave my house no later than 6:30 every morning. This means I usually eat breakfast around 6:15 and I wait until around 12:30 to eat lunch. 6 hours is a long time to go without a meal! So it's pretty important for me to eat something that will fill me up with maybe a small snack around 10:30 or 11:00. These muffins definitely did the trick! I substituted whole wheat flour for half of the all-purpose and with the oatmeal and cranberries, I only needed one or two to satisfy my hunger. These muffins bake up nice and moist and the tart cranberries pair perfectly with the sweet brown sugar muffin. If you're not a big fan of cranberries, try adding in blueberries instead. I think a blueberry-banana combination would be great!

This recipe makes about 16 muffins - perfect for Neal and I to eat throughout the week. By the way - I found this recipe at the Williams Sonoma website. I had no idea they had such a huge collection of recipes! They might be my new go-to source for new ideas, especially their breakfast collection. Check it out when you get a free minute! (Picture and recipe adapted from Williams Sonoma)

Ingredients:

  • 2/3 cup all-purpose flour
  • 2/3 cup whole wheat flour
  • 2 tsp. baking powder
  • 1/2 tsp. baking soda
  • 1/2 tsp. kosher salt
  • 2 1/4 cups rolled oats
  • 3/4 cup sour cream
  • 1/2 cup milk
  • 8 Tbsp. (1 stick) unsalted butter, melted and cooled)
  • 2 eggs, lightly beaten
  • 1 cup firmly packed brown sugar
  • 1 cup chopped fresh or frozen cranberries
Preheat an oven to 350 degrees.  Line 16 standard muffing cups with paper liners, or butter/oil the cups.

In a bowl, whisk together the flour, baking powder, baking soda and salt.  In another larger bowl, stir together 2 cups of the oats, the sour cream, milk and butter until combined.  Add the eggs, then the brown sugar and stir until combined.  Gently stir the flour mixture into the oat mixture. Fold in the cranberries.

Fill the prepared muffin cups to the rims.  Sprinkle the remaining 1/4 cup oats evenly over the muffins.  Pour a little water into any empty muffin cups to prevent scorching.  Bake until the muffins are golden brown and a toothpick inserted into the center of a muffin comes out clean, about 20-25 minutes.  Let the muffins cool about five minutes, then unmold the muffins onto a wire rack and let cool slightly.  Serve warm.

Monday, October 29, 2012

Butternut Squash Mac and Cheese

I'm a huge fan of butternut squash soup in the Fall. I love the sweet/salty flavor and especially the creaminess it adds. A few weeks ago I bought a huge butternut squash from the Farmer's Market and wanted to try to make something different with it. Almost every blog I hop on to look at recipes has so many unique and different ways to use the gourd! Already having a deep love for homemade mac and cheese (I love basically anything that has cheese in it..), I couldn't resist trying out this recipe with the addition of squash. I was very surprised at the ending flavor and how it all turned out! Neal tested it before the final result of the added spices and thought it was just okay, but once I added a bit of salt and herbs, he loved it. Result of the story: Don't forget your spices!

Please don't be skeptical about adding in squash to mac and cheese! It makes the dish so creamy and slightly sweet and I absolutely loved. I roasted the butternut squash before pureeing it which brought out all of the best flavors. For the cheese I used a combination of sharp cheddar cheese and Parmesan cheese and added in some garlic powder, rosemary, chili powder, nutmeg and pepper to add some extra flavor. If you have the extra time, I also think adding breadcrumbs to the top and baking it for a few minutes would add an amazing texture and crunch. This is definitely going to be a fall favorite from now on! (Recipe and picture courtesy of Two Peas and Their Pod)

Ingredients:
  • 1/2 medium butternut squash, peeled, seeded and chopped
  • 1 Tbsp. olive oil
  • 1/2 lb. elbow macaroni
  • 2 1/2 cups milk, divided
  • 2 Tbsp. butter
  • 3 Tbsp. flour
  • 1/8 tsp. nutmeg
  • 1/4 tsp. garlic powder
  • 1/4 tsp. chili powder
  • 1/2 tsp. dried rosemary
  • Salt and pepper to taste
  • 1 cup sharp cheddar cheese, shredded
  • 1/2 cup Parmesan cheese, shredded
  • 5 strips cooked bacon (optional)
  • 1/2 cup green onions, diced (optional)
Preheat oven to 400 degrees. Place butternut squash chunks on a baking sheet and drizzle with olive oil and salt and pepper. Roast for 20-30 minutes or until tender, turning once.

While the squash is roasting, cook macaroni according to package directions. Drain well and set aside.

Add butternut squash to food processor or blender and puree until smooth. Add in 1/2 cup milk to thin out the squash, then puree again.

In a large skillet over medium heat, melt the butter. Whisk in the flour and add in the spices. Cook for 2-3 minutes, whisking constantly, until the flour mixture begins to smell nutty. Add in the remaining cups of milk gradually (1/2 cup at a time), whisking constantly until smooth and flour is dissolved. Turn heat to high and to a boil while continuing to whisk. After sauce has thickened turn heat to low and whisk in half of the butternut squash mixture. Taste and continue to add in the other half until it tastes creamy enough to you (all up to your personal preference). Add the sauce and the shredded cheese to the cooked macaroni noodles and stir until cheese is melted. Crumble the cooked bacon and green onions over the top (optional). Add salt and pepper to taste and serve immediately.

Optional: pour After cheese is melted, pour macaroni into a 2 quart casserole dish. Sprinkle with 1/2 cup bread crumbs and bake for 20-30 minutes or until cheese is bubbling.

Monday, October 22, 2012

Zesty Lemon Icebox Pie


Neal's grandma's birthday was this weekend and for her requested cake/dessert, she asked for a lemon icebox pie. A what? Icebox? Yeah.. I had no clue. Ha! So I went to my trusty Southern Living website and searched for icebox pies. After sifting through a few recipes, I came across this one. Looked easy and sounded delicious, so I crossed my fingers and hoped this would be similar to what she asked for.

The original recipe called for a graham cracker crust, which I'm not a huge fan of. Especially with a fruit pie - it just didn't seem right! So I substituted a classic dough pie crust instead with fantastic results. I had to bake the crust by itself first before adding in the filling since the filling only cooks for 15 minutes. The pie itself was heavenly. The zesty lemon flavor paired perfectly with the sweetened condensed milk making a tart and sweet creamy filling that tasted uh-mazing. I topped it all with a layer of lightly sweetened freshly whipped cream and twisted lemon slices. It was a very simple dessert but the ending flavor turned out amazing. I didn't have the patience time to wait for it to completely cool, but I think waiting the full time would make it even better. (For the pie crust recipe, click here. This recipe makes enough for two crusts, so cut in half for just a single pie.)

Ingredients:
  • 1 pre-baked pie crust
  • 6 egg yolks
  • 2 cans sweetened condensed milk
  • 1 cup fresh lemon juice
  • 1 cup whipping cream
  • 2 Tbsp. powdered sugar
  • Garnish: fresh lemon slices, mint leaves (optional)
Preheat oven to 350 degrees. Whisk together egg yolks, sweetened condensed milk and lemon juice until smooth. Pour into baked pie crust. Bake for 15 minutes. Let cool completely on a wire rack (about 1 hour). Cover and chill for 4 hours.

Beat whipping cream and powdered sugar on high speed until soft peaks form. Dollop and smooth over cooled pie. Top with fresh lemon slices and mint leaves and serve immediately.

Saturday, October 13, 2012

Outback Steak Salad with Blue Cheese Vinaigrette

I love to have hearty salads for dinner every now and then, but I always have to make sure they are "manly" enough for my husband to eat too. Otherwise I get a few rabbit/chick food comments as we're eating, followed by a bowl of cereal or sandwich for a second meal. This one definitely did the trick! Every time we go to Outback to eat, I always get the exact same dish: 8 oz. sirloin, wedge salad with blue cheese vinaigrette, and a baked sweet potato. I love every single thing about each part of the meal, especially the wedge salad that Neal introduced me to a couple of years ago. The dressing is definitely the best part so I decided to try and recreate it. I used a skirt steak, sliced thinly but I think any type of tender, non-fatty steak would work great. You definitely don't want fat on a steak salad.. I was very impressed at how close this dressing compared to Outback's and I may have licked the remaining drops out of the bowl..

Ingredients:
  • 1 lb. steak, grilled with your favorite seasonings/marinade
    • I used A1 Peppercorn sauce - my absolute favorite steak sauce!
  • 1 bag mixed greens/spring mix
  • 1 cup grape or cherry tomatoes
  • 1/2 cup pecans
  • Onion Strings
    • 1 large yellow or white onion, sliced into thin strips
    • 1/2 cup milk
    • 1 egg
    • 1/2 cup - 1 cup flour
    • Salt and pepper
    • 1/2 cup canola oil
  • Blue Cheese Vinaigrette:
    • 1/4 cup olive oil
    • 1/4 cup white wine vinegar
    • 1/2 tsp. balsamic vinegar
    • 2 tsp. Dijon mustard
    • 2 Tbsp. sour cream
    • 2 Tbsp. honey
    • 1 Tbsp. chopped fresh basil
    • Salt & freshly ground pepper, to taste
    • 1/2 cup crumbled blue cheese
For the Onion Strings:

Heat oil in a skillet over medium-high heat. Mix the milk and egg together in a medium bowl. In a separate bowl mix the flour, salt and pepper. Dredge onion slices in the milk mixture, then in the flour. Drop onions into the hot oil and let them saute, turning every 30 second to 1 minute. Remove to a paper towel when they become light brown.

For the Blue Cheese Vinaigrette:

Put all ingredients except blue cheese in a food processor/blender and blend until smooth. Add in the blue cheese crumbles and mix again.

To Assemble the Salad:

Layer the mixed greens, tomatoes and pecans on plates. Slice the steak thinly and lay on top of the greens. Top with a handful of onion strings and drizzle the vinaigrette over top. Serve immediately.

Friday, October 5, 2012

Upside-Down Caramelized Peach Cake

I was at the local Farmer's Market (again!) last weekend, excited to see all of the beautiful pumpkins, squash, apples and Fall flavors everywhere! I have to be honest that I was pretty surprised to still see peaches there since here in the South their peak season has passed. Turns out the peaches were freestone from Idaho, which I found out was about the last place that they are in season right now! Of course I couldn't resist my favorite fruit so I bought a small basket and after devouring a couple, I decided to find a yummy peach dessert to use the rest in. I pulled out an old Southern Living Magazine that I had kept from the summer and turned to this recipe. Perfect! I had all of the ingredients and knew I had to make it! One last shout-out to peaches for the year.

This cake turned out heavenly! My dad always made an incredible peach cobbler in a dutch oven when I was growing up, and this cake tasted very similar. The only major difference was the caramel that coated each beautiful slice. Oh, caramel.. I have a love-hate relationship with him. So delicious, smooth and creamy, but let it cook for just 10 seconds too long and you end up with a thick, black, stinky, smoky mess all over your pan. Gross. Thank goodness I had plenty of sugar to try again!

So as a suggestion: CAREFULLY watch the sugar as it's melting and turning that beautiful amber color. The first time I let the sugar cook until it was the perfect color, then took it off only to watch in horror as it quickly burned and tasted like those nasty popcorn kernels that cook too long. The second time I took my pan off the burner as soon as the sugar began to turn from clumps to liquid and stirred it for a couple more minutes until it was mostly melted. I left some clumps in the pan and they melted perfectly while the cake was baking. So aside from the tricky caramel, the rest was really easy. The cake was so moist and mixed great with the sweet/tart flavor of the peaches and hot caramel sauce. And of course a scoop of vanilla bean ice cream doesn't hurt either!

Ingredients:
  • 4 medium peaches, unpeeled and cut into 1/3-inch thick wedges
  • 2 Tbsp. fresh lemon juice (about 1 large lemon)
  • 1 cup cake flour*
  • 3/4 tsp. baking powder
  • 1/4 tsp. baking soda
  • 1 1/4 cups granulated sugar, divided
  • 3/4 cup butter, at room temperature and divided
  • 1/2 cup firmly packed light brown sugar
  • 1 tsp. vanilla
  • 2 large eggs
  • 1/2 cup sour cream
  • Vanilla Bean Ice Cream (optional)
Preheat oven to 350 degrees. Toss peaches with lemon juice, set aside. Sift together flour, baking powder and baking soda.

Cook 1/2 cup granulated sugar in a 10-inc cast-iron skillet over  medium heat, stirring frequently with a wooden spoon, 5-6 minutes or until sugar melts and turns a light amber color (watch it carefully so it doesn't burn!!). Remove from heat. Immediately add 1/4 cup butter, stirring vigorously. Spread caramelized sugar to coat bottom of skillet evenly, and sprinkle with brown sugar. Arrange peach wedges in concentric circles over sugar mixture, overlapping as needed.

Beat vanilla, remaining 3/4 cup sugar and 1/2 cup butter at medium speed in an electric mixer until smooth. Add eggs, 1 at a time, beating until blended after each addition.  Add sour cream, beating until blended. Gradually add in sifted flour mixture, beating at low speed until blended and stopping to scrape bowl as needed. Spoon batter over peaches in skillet and spread to cover.

Bake at 350 degrees for 40 to 45 minutes or until golden brown and a wooden toothpick inserted in center comes out clean. Cool in skillet for 10 minutes, run a knife around edge to loosen.

Carefully invert cake onto a serving plate and drizzle with any reserved liquid.  Cut cake into wedges and top with ice cream, if desired.

Saturday, September 29, 2012

Mexican Stacked Burritos


I couldn't think of a better name for this meal than "Stacked Burritos." Neal suggested maybe calling it a Tostada or Stacked Tortillas because Stacked Burritos doesn't really fit, but I guess I'm just not creative enough to come up with a new name! :) I've made something similar to this a few times, but I never though to add in refried beans. These made a huge different and added a new flavor and texture from my go-to black beans. I loved how fresh all of the ingredients were and it came together so easy. Since Neal likes meat with most of his dinners, I added diced chicken to his side and left mine meatless. Both sides tasted great and made for an easy and quick weeknight meal (my favorite!).
 
Ingredients:
  • 1 can refried beans (16 oz.)
  • 1/2 cup medium salsa
  • 1 tsp. cumin
  • 1 tsp. chili powder
  • 1/2 cup sour cream
  • 4 tortillas
  • 1/2 cup frozen corn, thawed
  • 1 cup diced tomatoes
  • 1/2 cup diced green onions
  • 1 cup shredded cheddar cheese
  • 1 cup diced chicken (optional)
Heat oven to 350 degrees. Mix first 5 ingredients together, spread onto tortillas. Place 1 tortilla in a 9x13 inch dish sprayed with cooking spray. Top with 1/4 cup cheese, corn, tomatoes and onions. Top with a second tortilla. Repeat layers 3 times, cover with aluminum foil. Bake 20-25 minutes or until heated through. Top with salsa, hot sauce or cilantro. Cut into wedges and serve.

Tuesday, September 4, 2012

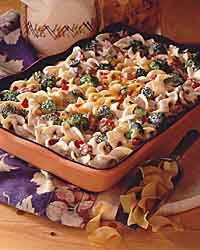
Cheesy Sausage, Broccoli and Mushroom Casserole

Sometimes when I think of the word "Casserole" I get a little anxious and unsure. I guess it's because it's what you always picture at a church potluck or funeral, but maybe that's just me! Anyway, I really did love this particular casserole for several reasons. It's a super easy meal that can literally be thrown together in 30 minutes and it also has your meat, noodles, vegetables and sauce all thrown into one container! It's definitely not fancy, but it's hearty, warm and flavorful and also very versatile depending on the kinds of vegetables you like. Oh, and it feeds a LOT of people - around 8-10 if you have a couple of other sides. Or you can serve it to 4 or 5 and then eat it for lunch over the next couple of days! Anything to get out of the old sandwich routine. :)


Ingredients:
  • 1 jar (16 oz.) Alfredo sauce (I love Classico brand, but anything works)
  • 1/3 cup milk
  • 1 pound sweet Italian sausage, cooked and crumbled
  • 1 package (9 oz.) frozen chopped broccoli, thawed
  • 8 oz. diced mushrooms
  • 1 red pepper, finely diced
  • 8 oz. egg noodles, cooked and drained
  • 1/4 cup shredded cheddar cheese
Preheat oven to 350 degrees. In a large bowl, combine Alfredo sauce and milk until smooth. Stir in sausage, broccoli, mushrooms, red pepper and noodles. Pour into a 9x13 baking dish and spread mixture evenly into pan. Sprinkle with cheese, cover with aluminum foil and bake 30 minutes or until heated through.

Sunday, August 26, 2012

Double Chocolate M&M Cookies


I know I already have a chocolate cookie recipe that's really similar to this, and it really is a great recipe. But I wanted to try something different... Something that produced a softer and chewier cookie, and this was the winner! I've made these cookies twice in the past two weeks and I'm still not sick of them. They're so chewy and chocolatey (is that a word?) and taste awesome with a mix of M&M's and white chocolate chips. This recipe also makes a lot of cookies - almost 4 dozen so there's a perfect amount to eat and share! (Recipe courtesy of Two Peas and Their Pod)
 
Ingredients:
 
  • 2 1/2 cups all-purpose flour
  • 1 teaspoon baking soda
  • 1/4 teaspoon salt
  • 3/4 cup cocoa powder
  • 1 cup unsalted butter, at room temperature
  • 1 cup granulated sugar
  • 1 cup light brown sugar
  • 2 large eggs
  • 2 teaspoons vanilla extract
  • 2 cups M&M's
  • 1 cup white chocolate chips
Preheat oven to 350 degrees.  Line a baking sheet with parchment paper or a Silpat and set aside. In a medium bowl, sift flour, baking soda, salt and coca and set aside. With a mixer, cream butter and sugars together until smooth. Add in eggs, one at a time. Next, add in vanilla extract and mix until blended. Slowly add flour mixture to sugar mixture and mix until flour disappears. Stir in M&M's and chocolate chips. Drop cookie dough by rounded tablespoons onto prepared baking sheet, about 2 inches apart.
 
Bake cookies for 10 minutes, or until the cookies are set around the edges, but still soft in the center. Don't over bake. Remove from oven and let sit on baking sheet for 3-5 minutes. Move to a cooling rack and cool completely.


Thursday, August 9, 2012

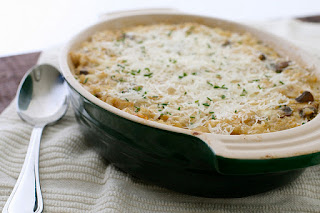
Mushroom and Brown Rice Casserole


I usually don't have too hard of a time coming up with ideas and recipes for the main dish each day, but the sides? Whew.. Now that's a whole different story. My mind draws a huge blank each time I try to think about sides and I usually go back to the same boring salad, corn on the cob, mixed veggies, salad, fresh fruit... salad.. You get the picture. It was so nice and refreshing to actually find a different side recipe other than salad! And if you haven't already picked up from my blog that I love mushrooms, then you need to come visit more! I absolutely loved everything about this casserole. The rice was moist and flavorful and the mushrooms and onions added a nice texture and flavor to the brown rice. It's a very simple dish, very creamy and comforting that reminds me of home. And the best part of all is I now have a new side dish to add to my salad and veggies! Perfect in my book. (Recipe and picture courtesy of Annie's Eats)

Ingredients:
  • 2 tsp. olive oil
  • 1 lb. brown mushrooms, cleaned and coarsely chopped
  • 1 large onion, finely chopped
  • 3 cloves garlic, minced
  • 3 cups cooked brown rice, at room temperature
  • 2 large eggs
  • 1 cup cottage cheese
  • 1/2 cup sour cream
  • 1/2 tsp. salt
  • 1/3 cup grated Parmesan cheese, divided
  • Minced fresh herbs (optional) such as chives, parsley, etc.
Preheat the oven to 350 degrees. Lightly grease a 2-qt. baking dish. In a large skillet over medium heat saute the mushrooms in the olive oil, stirring occasionally, until the mushrooms have released their juices, about 5-7 minutes. Add the onions to the pan and cook, stirring occasionally, until translucent and tender, about 5 minutes. Stir in the garlic and cook just until fragrant, about 1 minute. Remove from the heat. Add in the rice and stir to combine.

In a large bowl, whisk the eggs, cottage cheese, sour cream and salt until smooth. Add in the rice mixture and stir gently until blended. Spoon mixture into the baking dish and sprinkle most of the Parmesan cheese over the top, reserve a bit for finishing. Cover the dish with foil and bake for 30 minutes. Remove the foil and cook for an additional 20-30 minutes more, until the top is lightly browned. Top with remaining Parmesan and fresh herbs, if desired.

Tuesday, August 7, 2012

Caramelized Onion, Spinach and Mushroom Pizza with Garlic White Sauce

Some of my absolute favorite ingredients all in one combination that just happens to be on a pizza. Oh baby.. Can't get better than this! I loved the sweetness of the caramelized onions combined with the savory garlic white sauce. Add some sauteed sliced mushrooms and fresh spinach to make a beautiful and flavorful pizza! The mushrooms have enough substance to make it very filling so meat isn't necessary. Oh, and if you don't like mushrooms, this probably isn't the pizza for you... Just sayin'.


Ingredients:

Garlic White Sauce:
  • 4 cloves garlic, minced
  • 1 Tbsp. butter
  • 3 Tbsp. flour
  • 1 cup milk
  • Herbs such as basil, parsley, and oregano
  • Salt and pepper to taste
Toppings:
  • 1 large onion sliced thin
  • 1 small package cremini mushrooms, sliced
  • 1/2 bag fresh baby spinach
  • 2 cups Fontina cheese, grated (A mozzarella and parmesan mix works great too)
Make the garlic white sauce first. Melt the butter in a saucepan over medium heat. Add the garlic and saute for three minutes. Whisk in the flour until a roux or paste forms. Slowly add in the milk, whisking constantly to avoid lumps. Cook for about 4-5 minutes or until sauce begins to thicken. Add in a pinch of desired herbs and salt and pepper to taste. Set aside.

Place the sliced onions in a saute pan with a couple tablespoons of butter. Stir over medium-high heat for 5-10 minutes or until they become very soft. Add in sliced mushrooms and cook until mushrooms begin to release their juices and the onions begin to take on a caramel color.

Pour the white sauce into the middle of the pizza dough and spread around with a a ladle. Sprinkle on the onions, mushrooms and spinach and top with grated cheese. Bake pizza on a pizza stone in a 500 degree oven for 8 to 13 minutes or until edges are crisp and cheese is golden and bubbly in spots.

The Best Homemade Pizza Crust

I have another recipe for homemade pizza crust on here that I've used for years, but it was just missing something... My husband gave me a pizza stone for my birthday a couple of weeks ago and I was determined to find a crust worthy of my new stone! Of course it didn't surprise me a bit when I tried the basic pizza dough recipe from the America's Test Kitchen and it turned out amazing. I have yet to try a recipe from them that I don't like, and I honestly can't say that about any other recipe book I own or website I follow. I've said it before, but if you have to choose one particular cookbook, choose one by America's Test Kitchen. I have their Family Baking Book and I can't say enough good things about it!


The America's Test Kitchen Family Baking Book

Their cookbooks have "secret" tips and tricks to make the best recipes, particularly when it comes to baking. For their basic pizza dough recipe, they recommend three things to make the crust perfect: 1) Use bread flour because it gives the dough enough strength to be stretched thin, but still provide a crust that's very crisp and chewy once baked. 2) Use a pizza stone. Pizza stones retain heat and lessen the effects of temperature fluctuations. And 3) Preheat your pizza stone in the oven for at least 30 minutes before topping and baking. If you don't allow the stone to have enough time in the oven prior to baking your pizza, the crust will absorb moisture from the sauce and cheese before it cooks and will be limp and soggy instead of crisp and sturdy enough to hold its' shape.

This particular pizza crust uses instant yeast and takes a little bit longer than my other quick go-to crust recipe, but it is worth every extra minute. The result is a soft, chewy crust with a slightly crisp bottom that holds the pizza together perfectly. Both Neal and I agreed that this crust was even better than most food-chain pizza crust, and you really can't get any better than a homemade meal!

Ingredients:
  • 4 - 4 1/2 cups bread flour (all-purpose flour may be substituted but the crust will be less chewy)
  • 1 envelope (2 1/4 tsp.) instant or rapid-rise yeast
  • 1 1/2 tsp. salt
  • 2 Tbsp. olive oil
  • 1 1/2 cups warm water (110 degrees)
Combine 4 cups of the flour, yeast and salt together in a food processor or mixer (fitted with dough blade) to combine. With the processor/mixer running, pour the oil, then water in and process until a rough ball forms, 30 to 40 seconds.  Let the dough rest for 2 minutes, then process for 30 seconds longer. If after 30 seconds the dough is sticky and clings to the blade, add the remaining 1/4 cup flour 1 tablespoon at a time as needed.

Turn the dough out onto a lightly floured counter and form it into a smooth, round ball. Place the dough in a large, lightly oiled bowl and cover tightly with greased plastic wrap. Let rise in a warm place until doubled in size, about 1 to 1 1/2 hours, before using.

Divide dough into 2 equal pieces and press and roll each piece into a 14-inch round on a lightly floured counter. Transfer the dough to a parchment-lined baking sheet and reshape as needed. Lightly brush the other 1/2 inch edge of the dough with oil and top with desired toppings and cheese.

Slide the parchment paper and pizza onto the hot baking stone and bake at 500 degrees for 8 to 13 minutes, or until the edges are brown and the cheese is golden in spots.

This recipe will make enough dough for two 14-inch pizzas.

To make ahead: After the dough is mixed, do not let the dough rise but refrigerate it overnight or up to 16 hours. Let the dough sit at room temperature for 30 minutes before using. Alternatively, the pizza dough can be frozen for up to 1 month; let the dough rise as directed above, then wrap tightly in greased plastic wrap and freeze. Let the frozen dough thaw on the counter for 2 to 3 hours, or overnight in the refrigerator before using.

Sunday, July 29, 2012

Egg Stuffed Baked Potatoes

Sometimes I love trying out new things (obviously...) that are different and unique. I had heard of these egg stuffed potatoes on Our Best Bites' website a couple months ago and finally got around to trying it. I love baked potatoes and would probably eat them every day with my meal if I could.. Probably because I have more cheese and sour cream than potato.. I absolutely loved how these turned out and Neal thought they were great too. These are kind of like omelettes in a way, since they're so versatile and can be made with just about any ingredients you have in your fridge - the only two main ingredients you really need are potatoes and eggs! The only suggestion I would make would be to buy round, deep potatoes that look like bowls when cut in half so a cracked egg could sit inside without spilling over. These are such a fun idea.. I just wish I had thought of it! (Recipe and picture adapted from Our Best Bites).

Ingredients:
  • Baked Potatoes, slightly cooled
  • Ham or Bacon
  • Salt and pepper
  • Shredded cheese (cheddar, pepperjack, or either of your choice)
  • Eggs
  • Additional fillings of your choice: onions, tomatoes, bell peppers, mushrooms, etc.
Heat oven to 350 degrees. Slice a layer off the top of each potato (or, if your potatoes are large and deep, slice potatoes in half lengh-wise). Use a spoon to gently scoop out the insides, leaving a thin layer of potato against the skin and avoiding puncturing the bottom. Reserve scooped potato for another use. Brush inside of each potato with melted butter and sprinkle with a little salt and pepper. Sprinkle a layer of shredded cheese into each potato and add fillings. Fill each potato about 3/4 full. Crack one egg into each potato. Sprinkle with a little more salt and pper and top with additional cheese and toppings, if desired.

Place potatoes on a baking sheet and cook for about 20 minutes. Egg whites should be set and yolks soft. Don't overcook or else eggs will be hard and rubbery.
     

Sunday, July 22, 2012

Mushroom Lasagna with Parmesan White Sauce

I absolutely love mushrooms and this lasagna is packed full of them which makes it a perfect dinner for me. Now, unfortunately, if you don't like mushrooms, this lasagna is definitely not for you. But maybe you could still try it and let it show you what you're missing out on! I love this different twist on lasagna with the creamy white sauce and Parmesan cheese - completely different from your usual meaty lasagna with marina sauce, but so delicious. Do your taste buds a favor and try this out. You'll love it! (Recipe adapted from Mel's Kitchen Cafe)
Ingredients:
  • 12 no-boil lasagna noodles
  • 1 large garlic clove, minced
  • 4 cups milk
  • 3/4 cups butter (1 1/2 sticks)
  • 1/2 cup flour
  • 1/2 cup cream cheese
  • 1 tsp. pepper
  • 1 1/2 tsp. salt
  • 1/4 tsp. nutmeg
  • 1 1/2 lbs. baby bella or white mushrooms
  • 1 1/2 cups Parmesan cheese
Preheat the oven to 375 degrees. For the white sauce, heat the milk and garlic in the microwave until hot, and set it aside. In a large saucepan, melt 1/2 cup (1 stick) butter. Add the flour and cook for one minute over low heat, stirring constantly with a whisk or wooden spoon. Pour in the hot milk, a little at a time at first, and whisking until combined. Add in cream cheese, salt, pepper and nutmeg, stirring or whisking frequently until cheese has melted and sauce becomes thick (anywhere from 3 - 10 minutes). Set aside.

To prepare the mushrooms, slice them 1/4 inch thick. In a large skillet, heat 2 tablespoons olive oil and 2 tablespoons butter over medium heat. Add the mushrooms and cook for about 5 minutes, until they are tender and release some of their juices.

To assemble the lasagna, lightly coat the bottom and sides of a 9x13-inch baking dish with cooking spray. Spread 1/4 cup or so of the white sauce in the bottom of the dish. Arrange a layer of noodles on top (I used 3 noodles for each layer without overlapping them), then more sauce (about 1/4 of what remains), 1/3 of the mushrooms and 1/3 cup of the Parmesan cheese. Repeat two more times then top with a final layer of noodles, your remaining sauce and last 1/4 cup of cheese.

Bake lasagna for 45 minutes, or until top is browned and the sauce is bubbly. Remove from oven and let sit for 10-15 minutes before serving.

Note: I've halved this recipe for 2-3 people with great results!

Sunday, July 8, 2012

Blackberry-Peach Cobbler with Praline-Pecan Streusel


There are very few cookbooks, blogs and magazines that I can honestly say I have never been disappointed with a recipe. So when I say that I have never been disappointed with a recipe from Southern Living magazine, that's really saying something! This cobbler was yet another hit that I'll probably be making again and again every summer when all the fruit starts to ripen. There's an incredible farmer's market in my town that I try and go to every Saturday I can to restock my fridge with some of the season's best produce. I had picked up a pint of blackberries one Saturday and wanted to make a fun summer dessert with them. As soon as I noticed this cobbler recipe I knew I had to try it, and I was not disappointed.

I absolutely loved the combination of the peaches mixed with the blackberries. They added a hint of sweetness from the peaches mixed with the sweet-tartness of the blackberries. I also chopped up a fresh mango I had purchased at the grocery store and added it to the mix as well. The streusel was very easy and I loved the slightly chewy, slightly crunchy texture it added to the cobbler. We ate ours with a scoop of vanilla ice cream which melted over the hot cobbler and made for a perfect summer treat! (Recipe and picture courtesy of Southern Living)

Ingredients:

Streusel

  • 3/4 cup firmly packed light brown sugar
  • 1/2 cup butter, melted
  • 1/8 tsp. salt
  • 1 1/2 cups all-purpose flour
  • 1 cup coarsely chopped pecans
Filling

  • 4 cups peeled and sliced fresh peaches (about 4 large)
  • 1/2 cup granulated sugar
  • 3 Tbsp. all-purpose flour
  • 1/4 tsp. ground nutmeg
  • 2 cups fresh blackberries
Prepare Streusel: Stir together first 3 ingredients in a large bowl. Add flour and pecans, and stir until blended.  Let stand 20 minutes or until mixture is firm enough to crumble into small pieces.

Prepare Filling: Preheat oven to 375 degrees. Stir together peaches and next 3 ingredients in a large saucepan. Bring to a boil over medium-high heat. Reduce heat to medium and boil, stirring occasionally, 6-7 minutes or until juices have thickened. Remove from heat and stir in blackberries. Spoon mixture into a lightly greased 9-inch square baking dish. Crumble streusel over hot peach mixture. Bake at 375 for 30 to 35 minutes or until bubbly and golden brown.
     

Thursday, June 28, 2012

Turkey Taco Burgers with Green Chile Sour Cream

These burgers were a really nice change to your regular summer burger, and perfect for Taco Tuesday! They're super easy to make with an addition of taco seasoning and a few spices. But the thing that takes them over the top is the green chile sour cream and the guacamole. Top 'em off with your classic lettuce, tomato and onion and you've got yourself a dang good burger and a quick and easy week-night meal. (Recipe and picture adapted from Sweet Treats and More)

Ingredients:

Burgers:
  • 1 lb. ground turkey
  • 1 packet taco seasoning
  • Salt and pepper to taste
  • Dash of McCormick's Hamburger seasoning (optional)
  • 4-6 whole wheat hamburger buns
  • 4-6 slices cheese
Toppings:
  • Lettuce, Sliced Tomato, Sliced Onion, Cheese, Avocado/Guacamole
Green Chile Sour Cream
  • 1/2 cup reduced fat sour cream
  • 3 Tbsp. diced green chiles
  • 1/2 tsp. cumin
  • 1/2 tsp. garlic powder
  • 5-6 drops hot sauce (to taste)
In a medium bowl, mix the ground turkey, taco seasoning and spices together. Form into 4-6 patties and place on a hot grill. Cook until cooked through, flipping once. (You can also cook the burgers in the oven and broil each side for 7-8 minutes until browned and cooked through). Top each patty with a slice of cheese and leave until melted.

For the sauce: mix together all sauce ingredients in a small bowl.

To assemble: spread the green chile sour cream on the buns, then assemble hamburgers with your choice of toppings.


Monday, June 18, 2012

Brown Sugar Pork Chops with Peach Barbeque Sauce

A few weeks ago I had my first Georgia peach I've ever had. I was actually a little skeptical when I saw peaches in the grocery store becaue it seemed so early! Growing up in Utah our peach season didn't usually start until late summer so I thought surely they would be tart and hard. But what started with a single Georgia peach turned into literally dozens within just a couple of weeks. I can't get enough of the sweet juicy taste that each peach holds! Peaches are by far my favorite fruit. I even dressed up as Georgia Peach for Halloween one year, with a satin peach colored hoop skirt and white sandals. I cannot even begin to tell you how amazing this recipe was with fresh summer peaches. The June 2012 issue of Southern Living had an entire section dedicated to peach recipes and this was the first one I tried. I'm planning to try each and every one of them, by the way...

Back to the recipe: The pork chops are marinated in a brown sugar ice water and they pick up just a hint of sweetness that pairs perfectly with the peach barbeque sauce. The flavors of the barbeque sauce mesh together wonderfully: ginger, garlic, and onions are lightly sauteed, then mixed together with a mixture of ketchup, peach preserves and peaches that makes for a sweet and tangy sauce. This is the perfect summer recipe and makes for a unique and delicious twist on your basic grilled pork chops, or even chicken! Next time you have a bbq try this sauce out. I promise you won't be disappointed! And for all you fellow peach lovers, don't worry - there are many more peach recipes to come! (Picture and recipe courtesy of Southern Living)

Ingredients:
  • 3/4 cup firmly packed dark brown sugar
  • 1/4 cup salt
  • 2 cups boiling water
  • 3 cups ice cubes
  • 4 bone-in pork loin chops (about 2lbs.)
  • 1 medium onion, finely chopped
  • 1 Tbsp. canola oil
  • 1 garlic clove, minced
  • 1 tsp. ginger
  • 1 1/2 cups ketchup
  • 1/2 cup peach preserves or jam
  • 2 large peaches, peeled and cut into 3/4 inch chunks
  • 2 Tbsp. apple cider vinegar
  • Salt & Pepper to taste
Combine sugar and salt in a large bowl. Add boiling water, stirring until sugar and salt dissolve. Stir in ice cubes to cool mixture. Add pork chops; cover and chill 30 minutes. Meanwhile, saute onion in hot oil in a medium saucepan over medium heat 2 minutes or until tender. Add garlic and ginger; cook, stirring constantly, 45 to 60 seconds or until fragrant. Add ketchup, peach preserves and peaches. Reduce heat to low and simmer, stirring occasionally, 30 minutes or until sauce thickens. Add vinegar; season with salt and freshly ground pepper to taste. Remove from heat.

Remove pork from the brine. Rinse pork well and pat dry with paper towels. Preheat grill to 350 to 400 degrees (medium high) heat. Pour half of peach mixture into a bowl; reserve remaining mixture. Grill pork, covered with grill lid, 5 to 6 minutes on each side or until a meat thermometer inserted into the thickest part of the chop registers 145 degrees. Baste pork occasionally with peach mixture in bowl. Remove pork from grill. Serve with reserved peach mixture.

Tuesday, June 12, 2012

Strawberry-Chocolate Cupcakes with Whipped Cream Frosting

Well it was Sunday dessert time and after a dinner at my in-laws, my sister-in-law Lauren and I threw out ideas with the ingredients we had and came up with these babies! And I am SO glad we did.. The cupcake itself is soft, moist and cakey with chunks of fresh strawberries and chocolate chips. Then top it all off with a homemade whipped cream frosting and it honestly doesn't get any better than that! I love all the yummy fruits this time of year - especially berries and peaches.  My mom was in town this weekend and we went to a local farmer's market where they were selling huge blackberries, blueberries and buckets and buckets of peaches - my favorite fruit ever. I love summer desserts with fresh fruit and these cupcakes fit right in. I loved the sweet-tart flavor of the strawberries mixed with the deep chocolate flavor. And the frosting is so simple, but tastes perfect mixed with the sweetness of the muffins. After all, who doesn't love homemade whipped cream? (Recipe adapted from Annie's Eats; Picture courtesy of Lemons & Anchovies)

Ingredients:
  • 2 1/4 cups all-purpose flour
  • 1/2 cup cake flour
  • 1 Tbsp. baking powder
  • 1 tsp. salt
  • 2 sticks unsalted butter, at room temperature
  • 2 1/4 cups sugar
  • 1 1/2 tsp. vanilla extract
  • 3 large eggs plus 1 large egg white
  • 1 cup milk
  • 2 2/1 cups finely chopped strawberries
  • 1 1/2 cups chocolate chips
Frosting:
  • 2 cups whipping cream
  • 3-4 Tbsp. powdered sugar
  • 1 tsp. vanilla
Preheat the oven to 350 degrees. Line cupcake pan with paper liners. In a medium bowl, combine the flours, baking powder and salt. In the bowl of an electric mixer, cream together the butter, sugar and vanilla extract until light and fluffy, about 3 minutes. Beat in the eggs and egg white one at a time, mixing well after each addition. With the mixer on low speed, add the flour mixture in two additions alternating with the milk, mixing each addition until incorporated. Gently fold in the chopped strawberries and chocolate chips with a spatula.

Divide the batter between paper liners, filling about 3/4 full. Bake until light golden and a toothpick inserted into the middle comes out clean, about 25-28 minutes, rotating the pan half-way through. Transfer to a wire rack to cool completely.

While cupcakes are cooling, mix the whipping cream, powdered sugar and vanilla together with an electric mixer until thick and spreadable, but stop before it turns into a stiff buttery substance. Pipe or frost onto cupcakes after they are completely cooled. Store in the fridge until ready to use.

Sunday, May 27, 2012

Creamy Chocolate Ice Cream

I think everybody needs a basic chocolate ice cream recipe. Just think of all the possibilities you can do with it: Rocky Road, brownie chunks, Reese's cups, Chocolate-Strawberry, Caramel... and all of you more creative people can think of dozens of other flavors and add-ins to try. Or, if you like to keep it simple, just leave it plain and you'll be left with a creamy, thick ice cream that melts in your mouth. My mother-in-law and I made this up along with some strawberry ice cream to eat after a hot day of swimming, BBQ and yard games. I can't think of a more perfect ending to one of those days than homemade ice cream. This is a very basic ice cream recipe that literally comes together in less than 10 minutes. The tricky part is just waiting for it to cool so you can add it into your ice cream maker to enjoy the result. I'm looking forward to the summer months ahead to try out more flavors and new mix-ins... there really isn't anything that can compare to the taste and texture of homemade ice cream!! (Picture courtesy of Amanda's cookin'

Ingredients:
  • 1 cup milk
  • 3/4 cup sugar
  • 2 cups whipping cream
  • 1 tsp. vanilla
  • 1 cup semi-sweet chocolate chips
 In a medium bowl, whisk together the milk and sugar until sugar is dissolved. Whisk in whipping cream and vanilla just until combined. Pour milk mixture into a medium saucepan and add in chocolate chips. Stir over medium heat until the chocolate chips melt into the milk mixture. Remove from heat and let cool 15-20 minutes. Put pan in fridge and let cool completely (about 1 hour). When mixture is cold, pour into ice cream maker and proceed following manufacturer's instructions.

(Note: if you prefer your ice cream to be harder, simply transfer to a Tupperware and put in freezer for 1-2 hours or until it hardens to your preference.)

Tuesday, May 15, 2012

Smoky Bacon Pork Chops (or Chicken)

When I moved to Tennessee a couple of years ago I was nervous and anxious about a lot of things such as living among complete strangers and environments, being away from my family and friends, finding a good job that would support Neal and I while Neal finished school, and finding a good grocery store. I know, I'm such a nerd.. but grocery shopping is very important to me! I look forward to my weekly trips and finding new ingredients and recipes to try. When we moved here I tried 3 or 4 different stores that were close to where we lived and finally settled on Kroger for the majority of my shopping. Overall, it's a great grocery store and has everything I need and want at a good price. Then a few months ago, we moved to a town home a few miles down the road and all my grocery store options changed. The nearest Kroger was now completely out of the way and I absolutely hated the layout of the store and the lack of items that they carried. It's funny how two of the same stores can be so different.
So, from the recommendation of my mother-in-law, I tried Publix which was literally 1/2 a mile from our new home. Tried it and loved it!! I'll spare you all of the reasons why I'm addicted to shopping there, but one of the things I love is that they have one similar characteristic to Costco. Any guesses? Free samples! They have a mini kitchen type of set-up near the front of the store where they cook 2 or 3 new items every week for you to try out. There's also a rack of recent recipes they've made that you can look through for ideas and get all the ingredients while you're in the store. These smoky bacon pork chops were one those recipes that I tried while looking at the cereal aisle. I took the first bite and walked right back to the recipe rack to grab the recipe card and gather the ingredients. Neal loved it and scooped the leftover topping out of the bowl with a spoon. The pork chops or chicken breasts are topped with a creamy, cheesy and smoky sauce that adds fantastic flavor to the meat. It's a cinch to throw together and it can easily go from a quick weeknight meal to a Sunday dinner with guests. No, it's definitely not the healthiest dish (at all), but try substituting turkey bacon and light mayonnaise and you won't feel nearly as guilty. Served with a green salad and some warm bread and you've got yourself a quick and easy meal! (Picture and recipe courtesy of Publix) (And sorry for the lengthy description.. It really is delicious! :) )

Ingredients:
  • 3 oz. pepper jack cheese, shredded
  • 3 green onions, finely diced
  • 1/4 cup chopped bacon pieces
  • 1/4 cup mayonnaise
  • 1 tsp. Tabasco Chipotle hot sauce
  • 2 tsp. McCormick GrillMates Mesquite seasoning
  • 4 pork chops or chicken breasts (about 1 1/2 lbs.)
Preheat oven to 425 degrees. Spray a baking sheet with cooking spray. Season pork chops/chicken breasts with mesquite seasoning and place on baking sheet. Combine cheese, onions, bacon, mayonnaise and hot sauce in a small bowl. Spread cheese mixture evenly over the meat. Place on middle rack of oven. Cook pork chops 8-9 minutes, or chicken 20-25 minutes, or until no longer pink. Increase oven heat to broil and broil 2-3 more minutes or until cheese is lightly browned (Be careful to watch as you broil the meat so nothing is burned). Serve warm from the oven.

Sunday, April 29, 2012

Oreo Pudding Cookies

Maybe I'm a bit behind in the way of cooking, but I have never used pudding in cookies before! I have tried it in cakes and loved the soft and moist results, so of course I thought I should love it in cookies too, right? Right! These were fantastic. So soft and moist and I loved the addition of the Hershey Cookies 'n Cream bars. Ive only tried the Oreo pudding in these cookies, but I'm sure you could mix and match pudding flavors and mix-ins that would have excellent results. Some versions that are on my list to try: Chocolate pudding and chopped Reese's cups, or lemon pudding with white chocolate chips. So if you're looking to make some cookies but want something different from your regular chocolate chip or oatmeal raisin, try these! They're just as easy but have a unique taste and everybody will love them. (Recipe and picture courtesy of Sweet Treats and More)
Ingredients:
  •  1 cup butter, at room temperature
  • 3/4 cup brown sugar
  • 1/4 cup sugar
  • 1 (4 oz) package Oreo pudding mix
  • 2 1/4 cup flour
  • 1 tsp. baking soda
  • 2 eggs
  • 1 tsp. vanilla
  • 2 Hershey's Cookies & Cream bars, chopped into small pieces
  • 2 cups chocolate chips
Preheat the oven to 350 degrees.  Combine the flour and baking soda together in a small bowl, set aside. Cream together butter and sugar. Beat in pudding mix until blended, then eggs and vanilla. Add the flour and soda mixture. Stir in the Cookies & Cream bars and chocolate chips. Bake for 8-10 minutes or until cookies spring back when touched lightly. Let the cookies cool on the baking sheet for 5 minutes before moving to a cooling rack. Makes 2-3 dozen, depending on size.
 

Sunday, April 22, 2012

Glazed Mini Meatloaves

I'm back!!! No, I'm not dead, and no I have definitely not given up on this blog! And I have a whole bucketload of recipes that I've tried and loved over the past few months that I'm so excited about sharing! And all of them are very easy and quick which is always a good thing. I haven't had much time (if I've had time at all) over the past few months to plan or cook anything big or time consuming, so get ready for a bunch of simple but delicious dinner recipes to try out.
This first one went over really, really well. Is it just me or is everything better when it's mini-sized? Example: Cupcakes vs. Cakes. There's no guilt in a little cupcake! Riiiight..  Keep telling yourself that Mer. Another example: Sliders. My current favorite slider: the salmon patty sliders at Ruby Tuesday. Small and packed full of yummy flavor! These mini meatloaves fit right in to the "mini" category that seems to be everywhere lately. I had all of the ingredients for these meatloaves in my pantry and fridge which meant one less trip to the grocery store - Score! I loved how tender and juicy these meatloaves turned out. But my favorite part was definitely the glaze. Who knew 3 ingredients could taste so great together? I love the down-home taste and flavor of this meal. It's definitely going down as one of our regular meals from now on. (Picture and recipe courtesy of Mel's Kitchen Cafe)

Ingredients:
  • 17-20 Salting crackers, crushed fine (about 2/3 cup)
  • 1/4 cup milk
  • 1/3 cup minced parsley
  • 3 Tbsp. Worcestershire sauce
  • 1 large egg
  • 1 1/2 Tbsp. Dijon mustard
  • 1 tsp. onion powder
  • 1 tsp. garlic powder
  • 1 tsp. salt
  • 1/2 tsp. pepper
  • 1 1/1 pounds ground meat (I used ground pork, but ground beef or a combination would work great!)
Glaze:
  • 1/2 cup ketchup
  • 1/4 cup packed brown sugar
  • 4 tsp. cider vinegar
Preheat the oven to 425 degrees.  Stick cracker crumbs, milk, parsley, Worcestershire sauce, egg, mustard, onion powder, garlic powder, salt and pepper together in a large bowl.  Crumble ground meat over and combined until uniform.  Shape mixture into oval loaves and place on a baking sheet sprayed with cooking spray.

Mix the glaze ingredients together in a small bowl. Spoon the glaze over the top of each meatloaf, reserving about 1/3 of the glaze for dipping. Bake for 18-20 minutes or until the center of the loaf is no longer pink or registers 160 degrees on an instant-read thermometer. Serve with the remaining sauce.

Thursday, February 9, 2012

Oatmeal Snack Cake

First of all, in case you haven't already noticed, I'm not the best at posting recipes consistently. Especially now that I'm in the midst of tax season again. Finding and trying out new recipes usually doesn't happen as much during this time of year simply because I usually go for the simplest and easiest meals, usually the ones I have in my memory that I can whip out in no time. So let me apologize before-hand for the next couple of months and the lack of recipes that are sure to follow. :)


This cake was the exception. I found myself on yet another Sunday, craving something sweet and something different. I had my eye on this oatmeal cake for several weeks and had never found the time to make it. But you all know my philosophy: Sunday evenings are best lived when there's something sweet in the kitchen. I absolutely loved this cake. L-O-V-E-D it. I think I justified eating it every day for breakfast this week since it had oatmeal in it. That's kind of healthy, right??? I love this cake for its simplicity, good texture and even better taste. The oatmeal in this cake gives it more of a substance rather than a taste, so if you're not a big oatmeal fan, don't worry! This bears no resemblance to the thick bowl you're used to eating (or avoiding) in the mornings. The coconut and pecans in the icing remind me of a German chocolate type of frosting, but not so thick. It's extremely quick and easy to throw it all together and before you know it you have cake for dessert! And for breakfast for the next several days.. (Recipe and picture courtesy of Annie's Eats/Cook's Illustrated)

Ingredients:
For the cake:


  • 1 cup quick-cooking oats (not the old-fashioned kind)

  • 3/4 cup water, at room temperature

  • 3/4 cup all-purpose flour

  • 1/2 tsp. baking soda

  • 1/2 tsp. baking powder

  • 1/2 tsp. salt

  • 1/4 tsp. ground cinnamon

  • Dash of ground nutmeg

  • 4 Tbsp. butter, at room temperature

  • 1/2 cup granulated sugar

  • 1/2 cup packed light brown sugar

  • 1 large egg

  • 1/2 tsp. vanilla extract

For the Icing:


  • 1/4 cup packed light brown sugar

  • 3 Tbsp. butter, melted and cooled

  • 3 Tbsp. milk

  • 3/4 cup sweetened shredded coconut

  • 1/2 cup pecans, chopped

To make the cake, preheat the oven to 350 degrees. Spray an 8x8 baking dish with cooking spray and set aside. In a medium bowl, combine the oats and water. Stir together and let sit until absorbed, about 5 minutes. In another bowl, combine the flour, baking soda, baking powder, salt, cinnamon and nutmeg. In the bowl of a mixer, combine the butter and sugars together on high until light and fluffy - about 2-4 minutes. Scrape down the bowl as needed. Add in the egg and vanilla until incorporated. With the mixer on low speed, slowly add in the flour mixture in two additions and mix just until incorporated. Add in the soaked oats until combined, about 15 seconds.


Spread the batter into the prepared pan and tap lightly against the counter to remove any air bubbles. Smooth with a spatula. Bake until a toothpick inserted in the center comes out clean, about 30-35 minutes. Let the cake cool slightly in the pan, about 10 minutes.


While the cake cools, heat the broiler in the oven. In a bowl, whisk together the brown sugar, butter and milk. Stir in the coconut and chopped pecans. Pour and spread the mixture evenly over the cake. Return the pan to the oven and broil until the topping is bubbling and golden, about 1-2 minutes. Watch the pan cake carefully to ensure the topping doesn't burn!!! Let cool in the pan at least 1-hour. Slice and serve.

Friday, January 13, 2012

Oreo Brownie Trifle

I used to hate Oreos. I know, I know... Please don't hate me, but I did. My grandma used to keep them in a snowman cookie jar in her kitchen and they were the first things my brothers would go for whenever we visited her. But not me. I would always take a Dum Dum sucker or some crackers before I would go for an Oreo. Luckily, somewhere along my path of life, things changed. I'm not sure what exactly happened, but all of the sudden I loved Oreos. I could literally eat an entire package in one sitting if I really wanted to! To this day I still can't quite understand why I hated them so much, but I do know that I missed out on a lot of creamy, chocolaty goodness in my younger years. Thank goodness my tastes have changed! I made this trifle in honor of one of my good friends for her baby shower. I knew how much she loved oreos and anything chocolate, so I decided to combine the two flavors and make a rich, gooey dessert. I had to laugh every time someone asked me for the recipe at the shower because it is so simple. Unbelievably simple. As in 4 ingredients simple. I've always loved trifles and this one is not an exception. Oh, and did you know that there was an Oreo pudding mix you could buy? Just keep the calories coming baby! (So much for my "Healthy Year" resolution.. But I can cheat once or twice, right...?) (Picture courtesy of Love from the Oven)

Ingredients:


  • 1 box of brownie mix

  • 1 box Oreo pudding mix

  • 1 cup heavy whipping cream

  • 2-3 Tbsp. sugar

  • 1 package of Oreos

Bake brownie mix in a 9x13 pan according to the box instructions, let cool completely. In the meantime, make up the Oreo pudding according to the box instructions and refrigerate. With an electric mixer (or in a stand mixer), whip the whipping cream and sugar together on high speed until stiff peaks begin to form. Put half of the Oreos into a Ziploc bag and seal it tightly. Crush into small chunks using a hammer, rolling pin, tin can, etc. - use your imagination! Once the brownies are cooled, cut them into small squares and crumble half of them in the bottom of a trifle bowl. Scoop half of the Oreo pudding mix over the brownies and smooth over so all of the brownies are covered. Scoop half of the whipped cream over the oreo mix and smooth to the edges of the bowl. Sprinkle half of the crushed Oreos all over the whipped cream. Repeat the process again, layering with the remaining brownies, pudding, whipped cream and crushed Oreos. Decorate with whole Oreo cookies along top of the trifle. Refrigerate until ready to serve.